Showing posts with label Make. Show all posts

Sunday, February 1, 2015

Dark Chocolate Pot de Creme


With Valentine's Day just around the corner, you may be scrambling to think of the perfect date night, or rather, dreading the thought of finding an available dinner reservation later than 5:30. Why not change things up a little and have a Stay-In Date Night? Keep things low-key, maybe get some fresh flowers for the kitchen, cook with your favorite music playing, and pop open a favorite bottle of Prosecco..or two! Save room for this decadent dessert that you thankfully can make in advance. It is simple to make, yet easy to impress with. Pot de Crème ("pot of cream") is a traditional French custard. Super silky, dark chocolate, creamy heaven.

Dark Chocolate Pot de Crème
(For about 2 ramekins)

4 oz. dark chocolate, finely chopped
2/3 cup milk
1/2 cup heavy cream
3 Tbsp. sugar
4 egg yolks

1. Preheat oven to 350. Place ramekins in a baking dish.

2. Place the milk, cream, and sugar in a pot over medium heat, stirring until sugar dissolves. When mixture is hot, stir in chocolate.

3.  In another bowl, whisk your yolks together. Gradually add about half of the hot mixture to the yolks, whisking quickly. Whisk the yolk mixture back to the pot of milk and stir for a few minutes, then remove from heat.

4. Transfer the finished mixture to the blender and mix until smooth.

5. Fill the ramekins with the custard, not entirely to the top. Carefully pour hot water in the baking dish to cover the bottoms of the ramekins to bake in a water bath. Tightly cover the baking dish with foil and carefully place baking dish in the oven. Bake for about 30-40 minutes, until the custard is just set in the center. Remove ramekins from the water bath to cool. Refrigerate for at least 6 hours. Serve chilled with fresh whipped cream and sprinkle with cinnamon.

Tuesday, January 27, 2015

Chewy Fudgey Brownie Cookies


When you can't decide between a cookie or brownie....this is the best of both worlds.

The original recipe called for all purpose flour but I used coconut flour instead, making this an awesome delicious gluten-free option.

8 oz. of chopped semisweet or dark chocolate
3 Tbsp. butter
2 eggs
3/4 cup sugar
1/2 tsp vanilla
pinch of salt
1/2 cup of all-purpose flour (or coconut flour if available)
1/4 tsp baking powder
6 oz. dark chocolate chips

1. Melt butter and chocolate over double-boiler
2. Meanwhile, in stand mixer with whisk attachment, mix eggs and sugar on medium speed until pale and thick.
3. Add vanilla and salt, then add chocolate mixture.
4. Fold in flour and baking powder, then chips. Chill in fridge for about an hour, then scoop on parchment-lined tray by Tbsp. amount, placing a few inches away from one another. Bake for about 11 min at 350.

Monday, January 26, 2015

Pissaladiere (Onion Tart)


The newest addition to my cookbook collection is My Paris Kitchen, by Chef and cookbook author David Lebovitz. It's an ultimate collection of his recipes and photos that chronicle his life in Paris. An absolute dream for a foodie with Wanderlust! I made this savory onion tart-so delicious! You can pair this with a salad for a light lunch or supper, or cut into squares and pass as an hors d'oeuvre. If you love caramelized onions, this one's for you. I couldn't find anchovy filets, so I settled with whole anchovies which turn out are not as nice looking on the tart. For now it was fine, but I will use the better quality filets when I make this for company.

For the Crust:
3/4 cup tepid water
1 tsp. active dry yeast
2 cups All Purpose Flour
3 Tbsp. olive oil
1 tsp. sea salt

For Topping:
Olive Oil
3 pounds onions, peeled and thinly sliced
a few sprigs of Thyme
4 cloves of garlic, peeled and thinly sliced
1/2 tsp. sea salt
pepper
about 20 Nicoise olives
anchovy filets

1. In the bowl of a stand mixer with dough hook, combine water, yeast, and 1/2 cup of the flour. Let this stand for about 15 minutes until tiny bubbles appear.

2. While waiting, oil a bowl.

3. Stir in remaining flour, salt, and olive oil and mix on medium speed for 5 minutes until the dough is smooth and forms a ball. Place dough in oiled bowl, then turn it so oiled side is up. Place a towel over the bowl and let the dough sit in warm place until it rises, doubling in size, about an hour or so.

4. While you wait for dough to rise, you can get started with the topping. Heat a large skillet over medium-heat, add a few tablespoons of olive oil, then add the onions, thyme, salt, and garlic. Cook for about 30 minutes, stirring only a little, then stir more often as they cook down until they are a deep golden brown. Sprinkle pepper over and remove the sprigs of thyme. Prepare oven to 400 and line a baking sheet with parchment paper.

5. When dough is ready, prepare a clean work surface and lightly flour. Stretch the dough into an oval shape about 12 inches long and let rest for 15 minutes.

6. Transfer the dough to the baking sheet and pull dough until it reaches sides of pan. Spread the onions over the dough, then top with the olives and anchovy filets in a decorative pattern
 if desired. Drizzle with a little olive oil then bake for about 20 minutes. Brush edges with olive oil when you take out of oven.


Lemon Drop Pound Cake

~Lemon Drop Pound Cake~

The most lemony pound cake you will ever try. I made candied lemon peel to dress it up and drizzled royal icing over for a finished look as well. A slice of this with a cup of tea...heaven.

(For 1 standard 9 in. loaf pan)

For the batter:
220 grams cake flour
1 tsp. baking powder
4 large eggs
200 grams sugar
105 milliliters heavy cream
100 grams  unsalted butter, melted and cooled
zest and supremes of 2 lemons


For the glaze:
200 grams fresh lemon juice
180 grams 10x sugar

1. Preheat the oven to 325. Butter and lightly flour the loaf pan.
2. Sift the flour and baking powder together. Set aside.
3. In another bowl, combine the eggs and sugar, whisking to blend well. Stir in the cream.
4. Add the flour mixture, stirring just to combine.
5. Stir in the melted butter and lemon zest and supreme, working quickly.
6. Pour batter in loaf pan and bake for about 20 minutes, then open the oven and run a knife down the center of the cake to create an even split down the center when it's done.
7. Continue baking for about another 40 minutes, or until the top is golden brown or a cake tester comes out clean.

To make the glaze, combine the lemon juice and 10x sugar an pour over the cake while it's still hot, then put back in the oven for another 10 min. If desired, drizzle royal icing over when the cake has cooled. The cake lasts for about a week if wrapped well and refrigerated, or frozen up to a month.

Friday, November 28, 2014

Holiday Cookies!


Every year, just before the holiday season starts, I like to look through my growing stack of cooking magazines that I just can’t seem to let go of. I flip through the glossy pages, some splattered from coffee, the charming images of chocolate-dipped shortbread and sparkly cookies practically charging the air with that magical glow over the next month. Some recipes invoke specific memories from my childhood, and this is what makes holiday baking so wonderful.  No matter how busy this time of year gets, looking through old favorite recipes and thinking of new ones to create is a nice way to slow down, focus on life’s simple pleasures, and re-connect with those you love. What I love about baking and cooking is how it never fails to bring people together! Knowing that the Simmons Club of Boston will be hosting a festive cookie swap this December 14th, the timing could not be more perfect to roll up your sleeves and get those baking sheets out.  To say that I miss Simmons, my alma mater, would be an understatement, so it gives me so much excitement to be a part of this event by sharing some of my own tips!

 I plan out my baking, cookie decorating, and candy making strategically and with purpose. I like to make a variety, and usually will stick with a few old recipes that I know well, and then add on some new ones. I’ll find inspiration from bakeries I’ve visited while traveling, or put my own spin on something I learned at work.  It’s important to think of who you will be baking for, and any events you might have, like office cookie swaps, or a holiday cocktail party with friends. Planning on making a classic gingerbread that everyone loves and trying out that savory shortbread for the more adventurous eater will ensure you brought something for everyone to enjoy.

I’ve found that buying most ingredients (flour, nuts, etc.) and any specialty items, like cookie cutters, several weeks ahead, can save a ton of stress and time when it comes to your day-long baking session, if that’s what you plan on doing. Another industry tip: measure out all ingredients for each cookie first-even the night before- and keep everything organized. Once you start working, things will move faster when you have exactly what you need in front of you.  I also rely heavily on my freezer during the holiday cookie craze. As long as you wrap the dough properly, many types can be stored up to a month. I will often do this for slice-and-bake logs of dough.

Once you’ve baked your holiday cookies, it’s fun to focus on wrapping them in unique, personal ways. In the past, I’ve stacked cookies in clear plastic tubes, fastening both ends with fringed decorative paper and shimmery ribbons, so they look like those festive party crackers. I’ve also taken a wide shoe box, wrapped the bottom and top individually in beautiful wrapping paper from a specialty store, and filled it with brightly colored tissue paper. Anyone will appreciate even the simplest wrapping. And there’s no better time than now to make a gift extra special.

I’m happy to share a few of the cookies I plan on making this season: White Chocolate Pink Peppercorn Bark , Snowball cookies, and Stained-Glass cookies.

      Stained-Glass Cookies


These beauties are so fun to make and remind me of the ornaments I decorate my tree with! I love how whimsical they are...definitely a hit among kids for sure!

2 1/2 cups all-purpose flour
3/4 tsp. salt
1 1/2 sticks unsalted butter, softened
3/4 cup sugar
1 egg
1 tsp. vanilla
fruit-flavored hard candies such as Jolly Ranchers, about 6-8 pieces.
(makes about 4 dozen, depending on size)

Tools needed: cookie cutters, nonstick baking pad (Silpat)

1. Whisk flour and salt in bowl and set aside. Cream butter and sugar in mixer until light and fluffy. Add egg and vanilla, mixing to combine. Add flour mixture at low speed until just combined. Form dough into a disk, wrap, and chill for at least an hour.

2. While dough is chilling, unwrap candies and separate by color in plastic bags. Crush coarsely with a rolling pin.

3. Preheat oven to 350. Roll out dough on a clean, floured surface to about 1/8 in. thick and cut desired shapes. Cut centers from cookies with smaller cutters. Place shapes on Silpat and gently fill the center of each cookie with about 1 tsp. of crushed candy.

4. Bake on middle rack in oven for about 10-12 min. Allow cookies to cool for about 10 minutes before removing from Silpat. I lightly brushed some water around the edges of the candy centers and sprinkled more crushed candy for a different texture. The cookies should keep for about a week in an airtight container.


Snowballs

The snowball cookie is so simple and it’s the perfect addition to a holiday cookie platter for its “snow-dusted” look. The combination of dark chocolate and coconut is a classic. 

2 cups sweetened flaked coconut
1 cup finely grated unsweetened coconut
2/3 cup sugar
1/4 tsp. salt
2 large egg whites
2 teaspoons of water
30 1/2 in. squares of bittersweet chocolate from a 3.5 oz. bar
about 1/2 cup 10x sugar
(makes about 30)

1. Preheat oven to 350. Pulse sweetened and unsweetened coconut, sugar, and salt in a food processor until the flaked coconut is finely chopped. Add whites and water and pulse until mixture is moistened.

2. Roll level tablespoons of mixture into balls and place on a parchment-lined baking sheet. Make an indentation in the center of each ball and place a piece of chocolate, then pinch hole closed and re-roll into a ball. Bake for about 13-15 minutes. Only the bottoms should be golden. Allow to cool for a few minutes, then roll in 10x sugar, shaking off any excess sugar. These cookies should keep in an air-tight container for about a week.


White Chocolate Pink Peppercorn Bark 

While it’s not a cookie, I’ve found that Chocolate Bark is always a good idea. This recipe makes a great hostess gift, as I’ve discovered over the years, especially for a "foodie." It's a great way to incorporate some unexpected flavors and textures. You get some heat from the pink peppercorn which helps cut the sweetness from the chocolate. 

16 oz. white chocolate, chopped
1/4 cup pistachios
1/4 cup dried cranberries
About 1 Tbsp. pink peppercorn

1. Place 3/4 of chopped white chocolate over a double-boiler just until melted. While chocolate is melting, toast the pistachios in the oven for a few minutes and allow to cool before coarsely chopping. Also coarsely chop the dried cranberries.

2. Remove bowl of chocolate from heat once it's melted an add remaining chocolate, stirring often, until completely smooth and at room temperature.

3. Spread the chocolate onto parchment paper evenly, preferably into the size of an 8 x 10 in. rectangle. Sprinkle the top with pistachios and cranberries. Grind pink peppercorns evenly over the top and sprinkle a few whole peppercorns over for a finishing touch. Set aside for at least a few hours or until firm and break into bars.

Happy Holidays!


Monday, October 27, 2014

Candy Corn Petit Fours


Growing up so close to Salem, MA, it only feels natural to incorporate Halloween into my baking throughout October. I think of candy corn as the official Halloween candy and decided to put my own spin on this ultra-sweet confection!

1 cup All-purpose flour
1/4 tsp. salt
7 oz. almond paste
3/4 cup sugar
1/2 tsp. almond extract
3/4 cup butter
3 eggs
yellow and orange food coloring

For filling:
2/3 cup apricot jam and 2 Tbsp. amaretto, heated.

Glaze:
6 oz. dark choc.
1 tsp. corn syrup
1 stick butter

1. Preheat oven to 350. Butter 3 8 in. cake pans and line with parchment. lightly flour.

2. Sift flour and salt, set aside.

3. Beat almond paste, sugar, and extract.

4. Add butter until all combined, then add 1 egg at a time until fully incorporated. Add flour in 3 parts.

5. Divide batter into 3 bowls. Add yellow food coloring to one, orange to the other, and leave the third plain.

6. Bake for about 12-15 min. Allow to cool completely. After removing cakes from pan, set up on a clean work surface and brush the plain cake with the heated jam. Invert the orange cake onto the plain one, and brush the top with more jam. Invert the yellow cake onto the orange. Place foil on top of the 3-layer cake and place a heavy baking dish on top. Add a few canned goods if you have them to compress the cake even more. Refrigerate for at least 4 hours.

7. Transfer the cake to a baking sheet lined with parchment. Combine the chocolate, butter, and corn syrup in a bowl and melt over a double-boiler. Carefully pour half the glaze over the cake. Place in the freezer to set. Once it's set, remove, invert onto clean parchment, the glaze the bottom. Freeze again until set. Trim cake and cut into desired sizes. 

Sunday, October 5, 2014

~CHEWY CHAI SPICE COOKIES~


I LOVE Chai. Especially in the Fall, my favorite season. I drink it hot, iced, sometimes with milk, and usually almost always with a shot of espresso! Since I'm on this cookie craze with special orders and private parties, I thought it would be fun (and also basically genius) to make a chewy sugar cookie and give it a bold kick with spices!

2 1/4 cups all-purpose flour
1 tsp. baking powder
1/2 tsp. baking soda
1/2 tsp. salt
1 1/2 cups sugar, plus 1/3 for rolling
2 oz. cream cheese, cut into small pieces
1/4 tsp. ground cinnamon
1/4 tsp. ground ginger
1/4 tsp. ground cardamom
1/4 tsp. ground cloves
a pinch of pepper
6 tbsp. unsalted butter, melted
1/2 cup veg. oil
1 large egg
1 tbsp. whole milk
1 tsp. vanilla

1. Preheat oven to 325. Line sheets with parchment. Whisk flour, baking powder, baking soda, and salt together; set aside.

2. Combine 1 1/2 cups sugar with the next 6 ingredients in a bowl. Put the 1/3 cup of sugar in another bowl and set aside.  Whisk the melted butter of the cream cheese mixture just to combine, then whisk in the oil. Add the egg, milk, and vanilla. Whisk until smooth.

3. Add flour mixture. Dough will be soft.

4. Scoop dough and roll balls in bowl of sugar ad drop on baking sheets. Flatten dough balls with the bottom of a greased drinking glass. Sprinkle tops of cookies wit more sugar.

5. Bake trays of cookies one at a time, about 6 min, then rotate, and bake another 6 min. more or until they begin to brown.

Tuesday, September 30, 2014

~BROWN BUTTER CHOCOLATE CHUNK~

A classic favorite! I always make chocolate chip cookies using the "creamed-butter' method but wanted to try a new approach by browning the butter. This produces better flavor and a chewier cookie....yes please!!!

( For about 24 cookies)
1 3/4 cup all-purpose flour
1/2 tsp. baking soda
14 TBSP. unsalted butter
3/4 cup dark brown sugar
1/2 cup sugar
1 tsp. salt
2 tsp. vanilla
1 egg + 1 yolk
1 1/4 cup bittersweet chocolate chunks

1. Preheat oven to 325, line 2 baking sheets with parchment.

2. Whisk flour and baking soda together; set aside.

3. Melt butter in a skillet over medium-high heat and swirl pan constantly, cooking until it's a dark brown color and has a nutty aroma. Transfer to a large bowl.

4. Add both sugars,salt, and vanilla t melted butter and whisk until fully incorporated. Add the egg and yolk, whisking to combine until smooth. Let mixture sit for 3 minutes.

5.Whisk for about 30 seconds more, then incorporate flour mixture just to combine and add chocolate.

6. Scoop dough into desired size (I rolled balls and weighed them at about 40 grams each) and drop 2 inches apart on baking sheet.

7. Bake for about 7 min, then rotate pan and bake about 7 min, more or until the edges are set and the center still looks soft. Cookies should look puffy and have a crackly surface when you take them out.

Monday, September 29, 2014


~FLAN~


On a recent lazy day, I decided to visit my boyfriend Vartan and surprise him with his favorite dessert! He loves Flan and always says that if I ever want to make something for him, it can be that. It's a pretty simple, classic Spanish Custard, that, when inverted onto a serving platter, is covered with a glossy layer of caramel sauce. It's not the most glamorous dessert, and not always my first choice but I like to think I have good reason to make it for my favorite guy, and here's why:

We were only dating for less than a month when I left to study abroad in Barcelona. I will never forgot the most amazing week when he came to visit me. We fell in love with everything about Barcelona, from the art to the eclectic tapas bars/ Spanish desserts and I like to think of it as the place where we fell for each other. So I guess making Flan has more meaning than I once thought it to be!

If done right, Flan has a tender, creamy texture, shouldn't taste too eggy, and has a firm enough structure so it can unmold onto a platter without collapsing into a mess. The main thing is to bake the custard in a water bath because it needs even, gentle heat for baking. Otherwise, it will over bake and produce a rubbery texture and look scrambled inside. And definitely add a small amount of orange zest! A little goes a long way here, and gives the custard a refreshing flavor profile. A lot of recipes I looked it didn't call for it, but I know it was common in Barcelona, especially when made by my host-family!


Classic Flan (serves 6-8)

1/2 cup sugar
2 eggs and 3 yolks
1 1/2 cups low-fat milk
1 (14 oz. ) can of sweetened condensed milk
1/4 tsp. grated orange zest

1. Preheat oven to 350. Place a dish towel in the bottom of a large baking dish and put a 9 inch round cake pan on the towel.

2. In  a small saucepan, combine the sugar and a small amount of water to make a wet-sand consistency. Bring to a boil and cook-do not stir- until the color has a faint golden color. Reduce the heat and continue to cook until caramel is a dark amber color.

3. Pour caramel into the cake pan. Allow to cool. It will harden but this is ok.

4. Whisk eggs and yolks together with milk and sweetened condensed milk, and then add the orange zest. Pour the mixture into the cake pan.

5. Place baking dish with cake pan into the oven and carefully pour hot water into the baking dish so it reaches about halfway up the sides of the cake pan. Bake for about 30-40 min, depending on your oven. It should look just barely set in the center. Carefully remove from the water bath and allow to cool at room temp. for 2 hours, then wrap well in plastic and chill in fridge for another several hours.

6. To unmold, take a knife and carefully run along the edges of the cake pan. Take your serving platter, invert over cake pan, and then flip it quickly onto platter.

Thursday, July 24, 2014

Wedding Cookies

Last Saturday, one of my best friends, Kayla, tied the knot! The ceremony and reception were held in her backyard at her new home. It was a very sweet and special day! I was happy to contribute to the dessert table and make Kayla's favorite, French Macarons (raspberry and almond). I'm all for making things personable and unique, so I also made monogrammed  and painted sugar cookies. Guests seemed to love the cookies as they disappeared within minutes. I should have made more! I think anything monogrammed at a wedding is just the perfect little touch. And the luster dust I used to paint designs added an unexpected pop of color.

Painted Cookies that sparkle!


To paint the cookies, add luster dust to a small bowl and add a few drops of either lemon or almond extract to get the right consistency. Using a clean small paintbrush, (found some at Michaels that are appropriate for pastry use) paint stripes or other designs across icing. Make sure your royal icing has set for at least 2 hours or more before painting on it.

Note: I used gold luster dust which can be found at NY Cake. I just added a few drops of pink coloring until I found the right color.

Thursday, June 26, 2014

Summertime Treat


Hello, Summer! There's nothing quite like a summer in New England. Long beach days followed by chill backyard get-togethers... Lobster rolls, strawberry festivals, fireworks, sailboats....love it all.

Looking for a summer dessert that's fast, simple, and healthy?

Utilizing what's in season makes summer entertaining easy and of course, delicious. I'm a pastry girl, but I'm all about healthy living first. It's all about balance. And it's definitely possible to enjoy your dessert without the guilt! This cobbler is great because the ingredients are simple....probably have most of them in your pantry already.

                  Blueberry Peach Cobbler
For the Biscuits:

1 2/3 cup Flour
3.5 Tbsp Sugar
1.5 Tbsp Baking Powder
1/8 tsp Salt
6 Tbsp unsalted butter, cold and cubed
2/3 cup plus 1 Tbsp heavy cream

1. Combine first 4 ingredients in mixing bowl and use a whisk to incorporate evenly. Add cubed butter and with the paddle attachment, mix on low speed until butter is lentil sized. On low speed, slowly add the 2/3 cup of heavy cream. Dough will be very soft.

2. Place dough on floured surface and gently knead into ball. Divide dough into small pieces and shape and flatten into rounds, about 1 1/2 -inch thick. You should get about 8 or 9 rounds. Wrap in plastic wrap and chill while making the filling.


For the Filling:

1 1/2 cups Sugar
1/4 c. cornstarch
about 8 peaches, peeled, and sliced
about 1 1/2 pints blueberries
1 vanilla bean, split and scraped (or 1 tsp vanilla extract if you don't have vanilla beans)
2 Tbsp Honey
1 tsp Cinnamon

1. Preheat oven to 350. Whisk the sugar and cornstarch together in a large bowl until combined, then add the fruit and combine to coat with the sugar mixture.

2. In a saucepan over medium heat, combine the honey, vanilla, cinnamon, and 1/3 cup water and bring to a boil. Add the fruit mixture and simmer. Stir occasionally for about 5 min, until the sauce thickens.

3. Place fruit filling in a baking or casserole dish and top with the biscuit rounds. Brush the biscuits with the remaining cream and sprinkle them with sugar. Bake until the biscuits are golden brown  and the fruit is bubbling, about 45 min. Allow to cool before serving.

I served this with Haagen Dazs Vanilla Ice Cream.


Saturday, April 13, 2013

Dinner Party Dessert

To celebrate the new spring season (even if the weather is still a bit chilly) I helped host a casual dinner party. Nothing fancy, but I was asked to make a  chocolate dessert. I decided on a classic Viennese cake, famously known as Sachertorte.


For the cake:
110 grams (3 3/4 ounces unsweetened chopped chocolate
110 grams unsalted butter, room temp.
55 grams confectioners sugar
6 egg yolks (save the whites for the meringue)
110 grams cake flour
110 grams granulated sugar

For the filling:
Apricot jam

For the chocolate ganache glaze:
8 ounces semisweet chopped chocolate
3/4 cup heavy cream
2 Tbsp light corn syrup

1. Preheat oven to 350. Prepare two 6 in. cake pans by spraying and lining with parchment rounds.

2. Fill a pan with water over high heat and place a bowl that fits over pan without touching the water. Place the unsweetened chocolate i the bowl and stir until completley melted. Set aside to cool slightly.

3. In a standing mixer with whisk attachment, beat egg whites on low. When the whites start to look frothy, slowly add granulated sugar, little by little. Raise the speed to high and beat until soft peaks form. Empty meringue into bowl to set aside. Clean mixer bowl and add the butter.

4. Soften butter in mixer with paddle attachment. Add confectioners sugar until light and fluffy.

5. Add egg yolks 1 by 1, scraping bowl down after each addition.

6. With motor on low, add melted chocolate all at once. If you don't do this all at once, the chocolate may set up and become too hard to fully incorporate.

7. Once chocolate is fully incorporated, remover bowl from mixer and by hand fold in the meringue. Leave the mixture slightly streaky, then carefully fold in the cake flour.

8. Divide batter evenly between the pans and bake for about 30 min.

9. Remove cakes from pans when done and cool on racks. When ready, use a serrated knife and slice each cake in half so you have four cake layers. With offset spatula, spread desired amount of apricot jam on each layer and assemble. I wrapped the cake at this point and chilled for about an hour before glazing.

10. Prepare glaze by placing in heavy cream and corn syrup in a small saucepan and just when it comes to a boil remove from heat and pour over chocolate. Whisk until it is shiny and smooth.

11. Pour glaze over the cake starting in the middle then down the sides, using an offset spatula to smooth over evenly. Allow to set before serving.

Special Tip: For a dramatic finish, I added caramel-dipped hazelnuts. To make the caramel, simply combine 1 cup sugar in a small saucepan and cover with just enough water so it has a wet-sand consistency. Cook over medium high heat until caramel is a light amber color. Thread hazelnuts on any kind of skewer you have and dip.


Saturday, March 16, 2013

Cupcake Decoration Idea for St. Pattys Day
 
 
Tiny Meringue Kisses!
 
 
You will need:
 
150 grams egg whites
300 grams sugar
green food coloring
Double-boiler
Stand Mixer with whisk attachment
Piping Bag
Sprayed Parchment Paper
 
Preheat oven to 200.
 
1. Place egg whites and sugar in a large bowl and whisk to combine.
 
2. Fill a large pot with water over medium-high heat. Place bowl of whites and sugar on pot so you have a double-boiler.
 
3. Keep a close eye on the whites, whisking ocassionaly. The eggs should not cook but should be hot to the touch and the sugar should be completly dissolved. When this happens, carefully remove bowl off pot and pour into mixing bowl with whisk, on the highest speed.
 
4. The meringue is ready when shiny and it holds a very stiff peak. Add desired amount of food coloring. Fill pastry bag with meringue and pipe small kisses onto sprayed parchment paper. Bake until meringues are firm to the touch, almost 1-2 hours. 


St. Patty's Day is tomorrow! This year I will most likely avoid the crowded pubs filled with college students and green beer. But there's no reason to stop tradition. Every year growing up, my mom would make a wonderful loaf of Irish Soda Bread a week or so before the holiday, and every morning for breakfast I would toast a piece and slather it with butter. It bakes beautifully, has a wonderful combination of flavors, and is perfect with a cup of tea.

 I never realized until now that Irish Soda Bread has somewhat of a bad rep. Traditionally, it's made with caraway seeds, which certainly have a distinct flavor that takes some getting used to. And I guess it's a bread that is often associated with being too dry. But it doesn't have to be! And perhaps it's just not what people are expecting after taking a first bite. There is no yeast in Irish Soda Bread (baking soda is the leavener), hence the name. It's almost like a scone. Buttermilk will keep this bread moist and lend a nice tangy flavor. My recipe is really fool-proof. Just make sure to cut an "X" across each loaf before baking! This will yield a nice top.

 Irish Soda Bread (makes 2 small rounds)
You will need:

4 cups flour
1/3 cup sugar
1 teaspoon baking soda
1 teaspoon salt
1 1/3 cups buttermilk
2 eggs, beaten
1/3 cup canola oil
2 cups golden raisins
 Caraway seeds (optional) *I used about 1 1/2 teaspoons*


1. Preheat the oven to 350 and line a baking sheet with parchment.

2. In mixing bowl combine first 4 ingredients and with a whisk mix everything to incorporate evenly.

3. Add the rest of the ingredients to the dry mix and with paddle attachment (or wooden spoon if doing by hand) mix just until everything comes together. The dough will be very sticky.

4. Lightly flour a clean surface and knead the dough until its smooth. Shape into 2 rounds and with a knife mark a large X on the top of each. Set on the baking sheet and bake for about 45 min.

5. The rounds should be golden brown when done. Tap on the bottom and if it sounds hollow this is also a good indicator they are ready. Transfer to a wire rack to cool.

 *Special Tip* Serve with whipped honey butter


Saturday, February 23, 2013

Oscars Night!


The Oscars are tomorrow! Every year for as long as I can remember, the Oscars were a special event I never missed. My eyes would be glued to the TV, scanning the red carpet for all my favorite Hollywood stars. Of course, Oscars night was another reason in my house to eat! We usually had Chinese take-out. But this year, I'm dressing up some classic treats we can always count on during any Blockbuster hit: Popcorn and Candy!


Truffled popcorn
 
1/2 cup popcorn kernels, popped
1/2 stick unsalted butter, melted
1/4 cup truffle oil
1 cup grated parmesean cheese
sea salt and freshly ground pepper
pinch of sugar
1. Place popcorn in a bowl, add butter and oil, and toss to coat. Add parm and sugar and season with salt and pepper.

Candy Bar

"Twix bar"- 3 layers of shortbread, caramel, and dark chocolate, sprinkled with maldon sea salt.


For the Shortbread:
2 cups of flour
2 tsp. baking powder
1/4 tsp. salt
1 cup unsalted butter, room temp.
1/2 cup of sugar
 
For the caramel:
1 cup butter
1 cup sugar
2 cans sweetened condensed milk
4 tbsp light corn syrup
 
For chocolate layer:
8 oz. bittersweet chocolate, chopped
1 tsp. light corn syrup
1/2 cup butter
optional- sea salt for sprinkling


1. In a bowl, combine flour, salt, and baking powder.Set aside.
2. Cream butter and sugar until light and fluffy. Add flour mix and just mix until dough comes together. Line a 9x13 baking dish with parchment paper and lightly spray. Press dough evenly into dish and bake at 325 for about 18 min or until shortbread is golden. allow to cool.
3. For the caramel, combine butter, sugar, corn syrup and condensed milk in a saucepan and stir on medium heat until it cooks to an amber cool. Pour evenly over shortbread and allow to cool in the fridge so it sets before pouring the chocolate layer over.

4. Melt the chocolate, butter, and corn syrup over a double boiler. When completly melted and hot to the touch, pour over the caramel layer and sprinkle with sea salt. Allow to cool and set completly, then cut into desired shapes.


Wednesday, February 13, 2013


Valentines Day has always been one of my favorite holidays. Some think its cheesy, and in many cases it can be, but I just see it as another reason to celebrate! I love all things heart-shaped, glittery, and sweet (no surprise there). Since I was a little girl, I always loved crafting my own Valentines cards and baking for the people I love in my life.
I often work with a local company around the holidays for their marketing purposes and I thought these classic sugar cookies decorated with royal icing make a lovely statement.  
SPRINKLED WITH LOVE

Polka dot ribbons for polka dot cookies. Every little detail counts!

I love the delicate, decorative edges!

Friday, February 8, 2013

So, the blizzard has started making its way towards the Northeast, and Boston has declared a state of emergency. I've been inside all day but all is good because I decided to pass the time by re-creating a grilled cheese sandwich I recently sampled from a food truck in Boston. Roxy's Gourmet Grilled Cheese  delivers an outstanding product. Why? Beacause they take a classic American favorite and update it with a twist, using fresh ingredients like carmelized onions and guacamole, without losing sight of what matters most: the perfect amount of gooey cheese between the most perfect two slices of buttery toasted bread.

You will need:(for 2 sandwiches)

 Fresh Guacamole (I made a quick version using half of a tomato, 1 avocado, clove of garlic chopped, splash of lime juice, and salt and pepper.

4 slices of white bread
5 slices of Applewood Bacon, cooked and roughly chopped.
Cheddar Cheese
Muenster Cheese
Butter


Melt about 2 Tbsp of butter in a large saute pan on medium heat and toast bread until golden brown on each side.


Cheese. Bacon. Guac. More Cheese. Top with bread. Place another skillet on sandwiches to press firmly, for a few minutes.


Done.

Saturday, February 2, 2013

I've been loving ginger in all forms this season. It is warm and soothing on a cold day, and the health benefits aren't so bad either. Ginger helps aid digestion, curbs nausea, improves circulation, and is a great overall cleansing agent.There are some great chewy ginger candies available at the store, but I love it so much I just had to make a big batch at home.


Candied Ginger
You will need:
1 lb. ginger, peeled and sliced thin
4 cups of sugar (plus more for coating)
4 cups of water
pinch of salt
Candy Thermometer
(If you don't own a thermometer, you can still do this. Just keep an eye on the pot and when the liquid is the consistency of thin honey, its ready!)But if you plan on making other candies, working with chocolate, etc, a  digital thermometer will really be useful.
 
 
Just Ginger, sugar, and water. This is so easy! Seriously, you probably have ginger somewhere buried deep in your produce drawer in the fridge. And I would hope you have some sugar. If you don't have water, I suggest you find another kitchen?


Peel the ginger with a spoon (like this^) instead of a veggie peeler. You will have a much easier time getting in all those nooks.


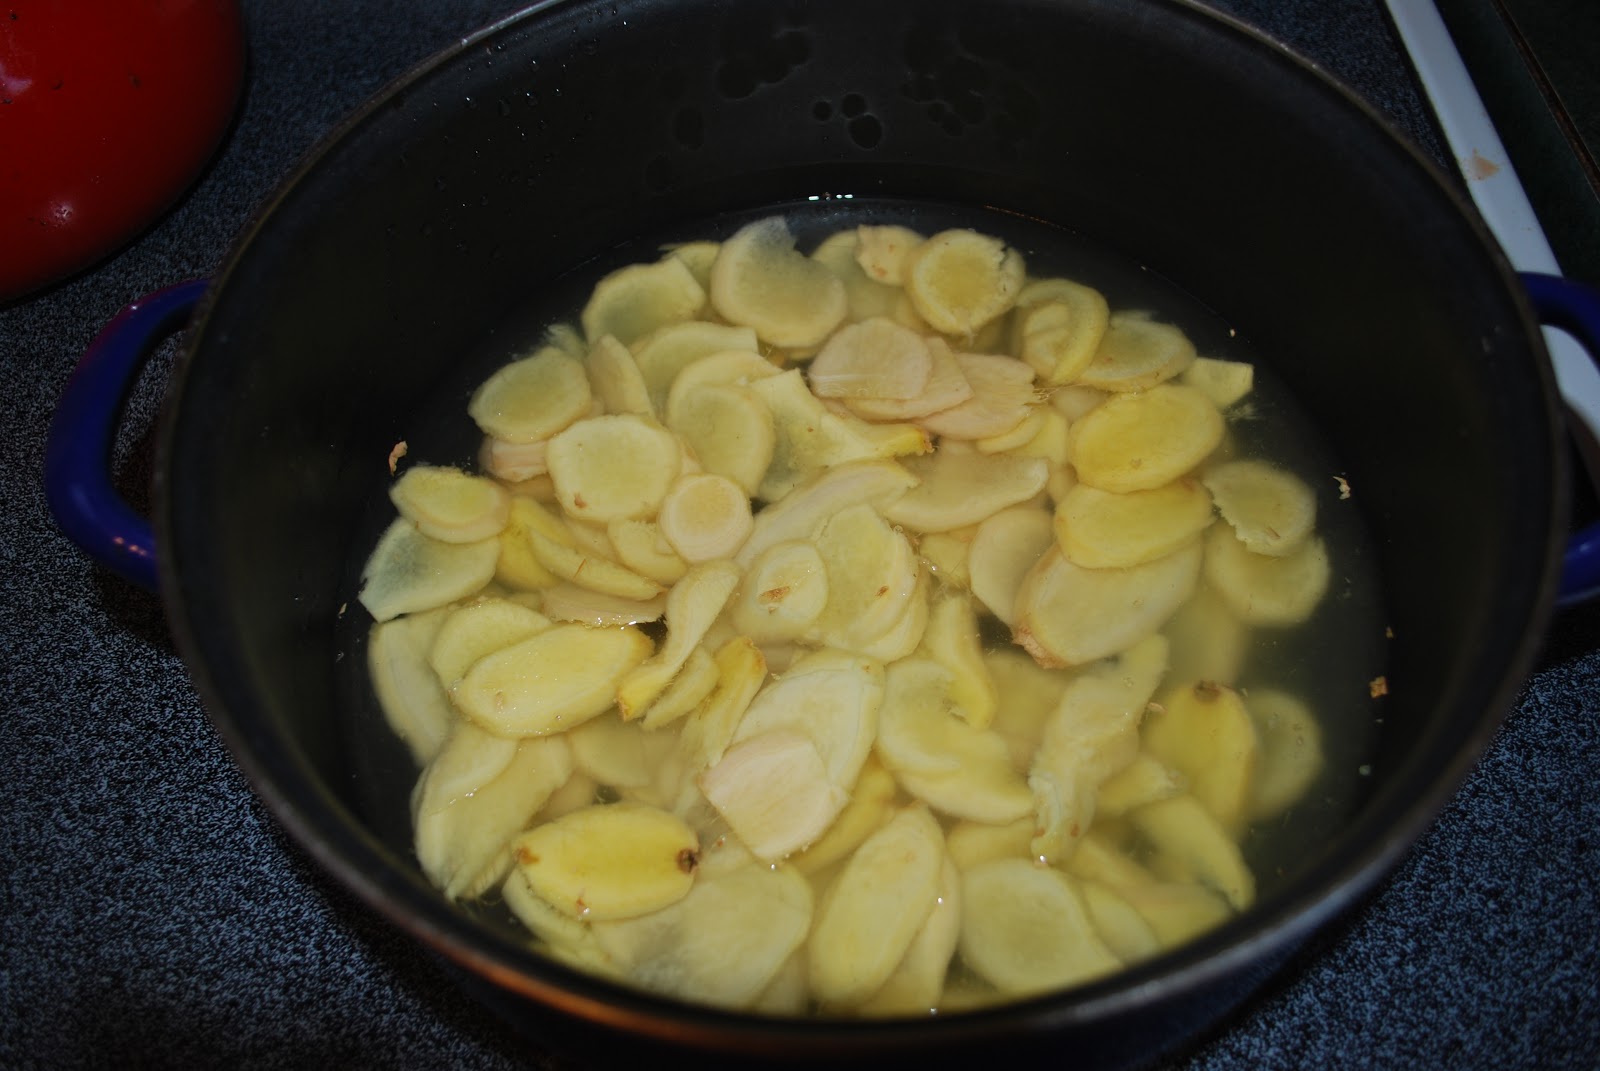
Slice the ginger very thinly and place in a large pot, add enough water to cover, and bring to a boil. Reduce heat and simmer for 10 min. Drain and repeat process one more time.


Mix the sugar and 4 cups of water in the pot, a pinch of salt and the ginger. Cook until the temp reaches 225 F. Remove from the heat and drain. You can save the syrup to make a fancy cocktail. If you want to coat in sugar, do so while the sugar is still hot. The candied ginger can be stored at room temp in a sealed container for a few months.
 
 
 TA -DAAA!